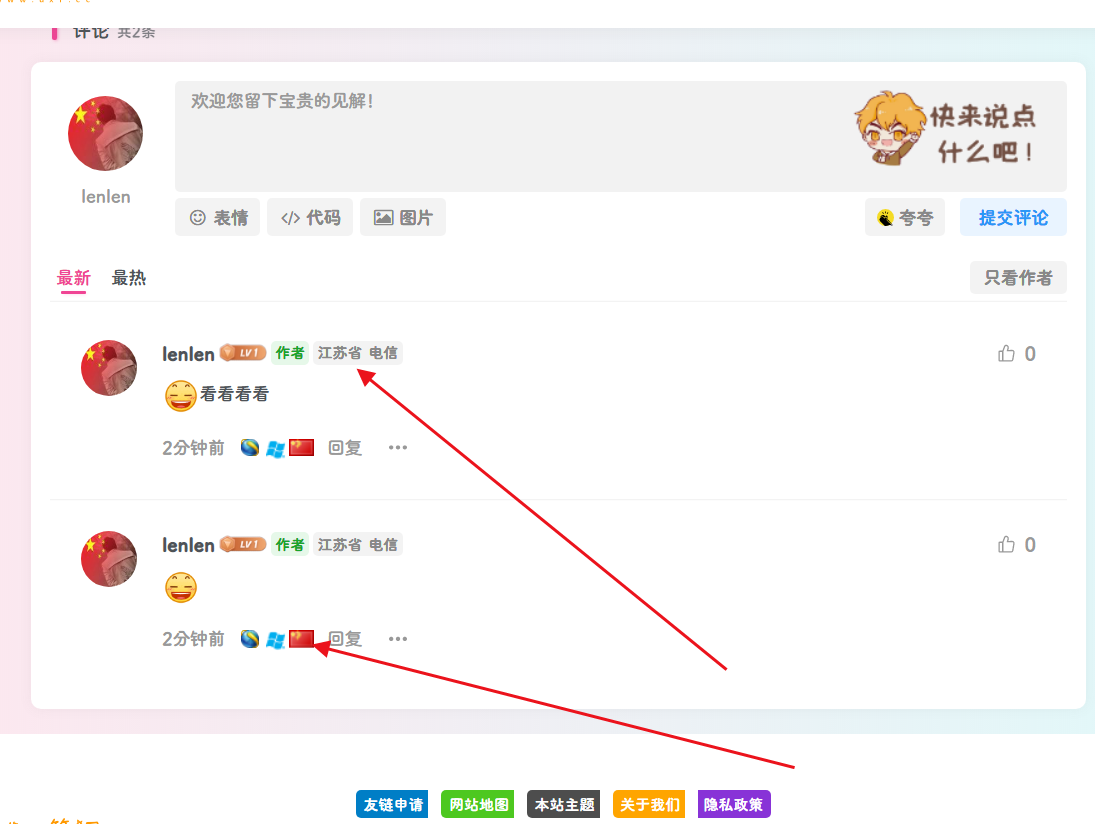
安装教程:
首先我们下载文件安装包
然后上传到程序子比主题,wp-content/themes/zibll目录里面,然后直接解压。
然后复制这个show-useragent文件目录,然后粘贴到网站根目录。
下面开始添加相关代码
1.在wp-content/themes/zibll目录的 functions.php文件里面添加两行代码
include("show-useragent/show-useragent.php");   // 显示访客信息
include("show-useragent/ip2c-text.php");        // IP归属地和运营商查询功能
2.将wp-content/themes/zibll/inc/functions目录下的zib-comments-list.php文件第51行的代码
注释掉并且添加代码如下图
![子比主题评论显示IP属地地址 插图3-轩逸博客 图片[3]-子比主题评论显示IP属地地址-优心笔记](https://oss.uzm.cc/wp-content/uploads/2022/09/2.jpg)
$ip = convertip(get_comment_author_ip()); return '<name class="flex ac flex1">' . $user_name . $badge .'<span class="badg badge badg-sm flex0 ml3">'.$ip.'</span>'.'</name>';3. 然后咱们再找到第98行代码,然后注释掉,并且添加代码如下图
![子比主题评论显示IP属地地址 插图4-轩逸博客 图片[4]-子比主题评论显示IP属地地址-优心笔记](https://oss.uzm.cc/wp-content/uploads/2022/09/3.jpg)
$diqu =  CID_get_comment_browser();
$diqu .= CID_print_comment_flag();
$time_html = '<span class="comt-author"' . ($is_mobile ? ' data-toggle="tooltip"' : '') . ' title="' . date('Y年m月d日 H:i:s', strtotime($comment->comment_date)) . '">' . zib_get_time_ago($comment->comment_date) . '</span>'.'<span class="comt-author" title="">'.$diqu.'</span>';
温馨提示:本文最新于
2022-12-18 21:23:29进行了更新,某些文章内容具有时效性,若失效或有错误,请在下方留言。© 版权声明
THE END


![WP主题美化教程集锦[笔记]-楊仙森万事坞](https://bg.leohi.top/meili/img/leohi/meihuabiji.png)
![2021喜剧动作《警醒》HD1080P[中英双字]-楊仙森万事坞](https://p0.meituan.net/moviemachine/c31af794101eb2ccdd31fb4e3fd70b04236578.jpg@464w_644h_1e_1c)
![[Android]没认证的电视&盒子照样看奈飞的剧 – Netflix – Kodi Edition[安卓TV端]-楊仙森万事坞](https://img.leohi.top/images/2023/02/27/0284d4b9054b.jpg)


暂无评论内容